Friday, 8 November 2013

Exciting News...


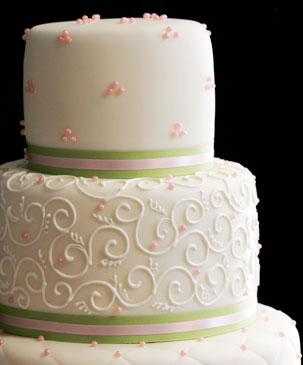
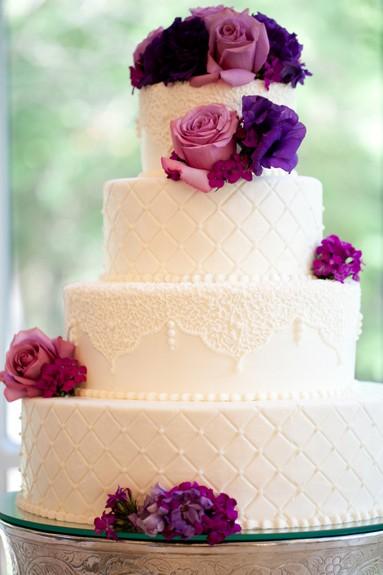
When I was at home over the weekend, I was asked to make a wedding cake for my cousin next July. Very exciting. It'll be a joint effort between my Gran and myself, as the couple want a combination of fruit and sponge cakes (you know how I feel about fruitcake). This will also mean lots of experimenting with fondant (a lot less forgiving that the buttercream of my first wedding cake trial run) hopefully, we'll learn together. Still, this is most exciting, and fingers crossed I'll be able to try out a scaled down version over Christmas! I'm looking forward to the chance to make another full-scaled cake creation, and have already started gathering ideas for a practice run... 

Watch this space!

If you're interested, there are plenty more pictures of wedding cakes, decorations and pretty wedding things on my Pinterest board.


Monday, 4 November 2013

Apple Sauce

One of the perks of coming home for the weekend? Getting to use your Dad's DSLR. I must get me one of these. Check out the blur.


I made the long (and extremely perilous) journey back to Wales during my University's 'opportunities week' (I know right, what a joke) this weekend, and, after unpacking, my first thought was 'what can I make for the blog?' I feel bad for the lack of posts on here of late, but it is extremely hard to get round to making things here, when you have no cake tins, mixing bowls or flour. All pretty important for baking. Also when your kitchen looks like this:

Shield your eyes, Mum!


Honestly, I leave for THREE days and look what happens.

My parents have an apple tree growing at the cottage they inherited a few years ago, and, on one of their many visits up there to paint this half term, found time to collect some of the fallen fruit. Having already made about 50 jars of chutney and several bags of apple sauce for the freezer, my Mum and Grandma were getting a bit stumped. That's where I came in. More than happy to spend a morning up to my elbows in apple peelings, I jumped at the chance to create something for you, dear readers.

I think I'm in love with this camera...
Apple sauce is great. You can keep it chunky and use it in crumbles or pies, or you can make it smooth and serve it with your dinner. It's also delicious in a any form with ice cream. It freezes brilliantly and will last a while in the fridge. You can spike it with any number of flavours: cinnamon, vanilla, blackberry, to name a few.
Yup, it's love.
It's also ridiculously simple to make, just a little time consuming. Just peel and core the apples, chop them up, and simmer with a splash of water, some sugar and a little lemon juice. Leave to soften for 10-15 minutes and you'll have a few bags of crumble filling ready at a moment's notice!


I will say though that the quantity of apple you use can be misleading. I have no idea the weight of apples that I used but it was about this many:


It may look like a lot, but all of those apples made one crumble and two small bags of filling. So I'd recommend getting more than you think you need, just in case. I also have no idea what kind of apples these were, as I said they were from a tree in the back garden of the cottage. I would liken them to granny smith maybe? Or definitely cooking apples will give you the same result. Go for something that will go soft pretty quickly when you cook it. Not eating apples, they rarely work in crumbles because they don't soften as well. Trust me.


Measurements for this recipe are, as always, quite vague. Amounts of water and sugar will vary depending on your personal taste and how thick you want your apple sauce to be. Be warned though that the apples will release a surprising amount of moisture when they are cooked, so I'd say add less water to start them softening than you think you need (the water is to help the apples cook and to stop them sticking to the bottom of the pan).


Apple Sauce

A bag of apples suitable for cooking, such as granny smith
3-5 heaped tbsp sugar
1/2-1 mug of cold water
squeeze of lemon juice

1. Peel and core all of your apples. Do this all in one go. You'll probably get fed up halfway through but you'll regret it if you don't finish them all, you'll be trying to stir, sweeten and peel all at the same time and the apples won't cook evenly if you add some later.
2. Chop the apples into chunks. Leave some pieces in cubes, some in slices, this means you'll get a lovely smooth sauce with some larger pieces in your crumble. If you're making a sauce, slice the apples thinner.
3. Add the apples to the pan with the lemon juice, sugar (to taste, go easy, you can always add more later), and water. Start off adding about half a mug, again, you can always add more later if the apples start to stick. Remember the apples will release a lot of liquid themselves.
4. Bring to a simmer, then reduce heat to low, stirring occasionally. Cover with a lid and leave to cook for 10-15 minutes, stirring occasionally to make sure the sauce doesn't stick. Add more sugar to taste, and more water if necessary.
5. Your sauce is done when the chunks of apple are tender and a knife will go through them easily. Remove the pan from the heat and leave to cool.

Use in crumbles, portion into bags and freeze or store in a jar/container in the fridge. Frozen apple sauce will keep well for about 12 months in the freezer. Defrost well before use.


Keep an eye out for a delicious apple cake coming soon, as well as a recipe for crumble topping!

Tuesday, 22 October 2013

Chocolate Orange Cake


What a genius combination.

This recipe came about when I was deciding what cake to make for my Dad's birthday before I left for Uni. When I was on holiday in Nice in the summer I visited a charming little sweet and chocolate factory, famed for its crystallised flowers and candied fruits. It was incredible. You can see some of the footage I took below:


Florian was amazing. If you're ever in the area, it's well worth a visit. Even if it's just for the free samples. Of which there are tonnes. As I said Florian is famous for its candied fruits, and among them, probably most famous for its satsumas. They're dipped, whole, in a sugar syrup every day for 80 days and left to crystallise. The skin is left on and the pips are left inside. They're very sweet but have a really nice orange tang. I knew I had to buy some.

After sharing round the sweet oranges when I returned, I knew I wanted to do something creative and yummy with the rest (it was quite a large box!). Chocolate orange cake seemed like the only logical answer.

Imagine a rich, dark, chocolate cake filled with a sweet orange buttercream, topped with dark chocolate ganache, swirls of chocolate orange frosting, chocolate shavings, and pieces of candied orange. Heaven.


I appreciate that whole candied oranges are not that easy to come by, and most likely, you won't have some just lying around your house. However, I do know that candied orange peel, and even orange segments are widely available, so perhaps it's worth experimenting with those. Failing that, some orange extract will do nicely, as will a combination of fresh orange juice and zest. Or, if you want to keep it simple, melt a terry's chocolate orange and stir that into some plain buttercream. You may have to add more icing sugar if you do this, though, to compensate for the extra liquid.


The recipe for the chocolate cake, which is the same as the Bailey's chocolate cake recipe can be found here.

Recipe for Ganache is here.

mmm...


Orange Buttercream
To fill a 8'' sandwich cake

200g butter, softened
450g icing sugar (you may need more or less, depending on how stiff you want your buttercream)
100g candied orange, finely chopped
freshly squeezed orange juice
zest of 1 orange

1. Cream butter and icing sugar together until pale and fluffy, about 5 minutes.
2. Add in candied orange, zest, and a tiny splash of juice. Mix well. Add more icing sugar if buttercream is too thin, or more juice if it's too thick. You're looking for something that will hold stiff peaks easily, but is still pipable. Whipping or mixing for longer incorporates more air and make buttercream easier to pipe.

Store in an air tight container in the fridge for up to 2 weeks. Also freezes well, just re-whip after defrosting.


Chocolate Orange Buttercream

Recipe as above
4tbsp cocoa powder OR 50-70g dark chocolate, melted

1. Combine orange buttercream with cocoa powder or melted chocolate. Add more icing sugar if needed to stiffen.

Wednesday, 16 October 2013

Chocolate Ganache


Pic courtesy of Google

Ganache is nectar of the gods.
Chocolate and cream, melted. Wonderfully simple.
It's super easy to make. Just melt the ingredients together, and pour. Covering a cake in ganache will help keep it moist for a few extra days.Or leave to harden in the fridge and scoop spoonfuls of it into balls to make delightful truffles.
Use it to top cakes, ice cream, biscuits, cookies, sweets...spoons...anything. And everything.

Pic from: cakesbakesandcookies.com


Chocolate Ganache
To cover a two layer cake
250g chocolate, chopped into small chunks (works with milk, white or dark)
250ml double cream

1. Heat the cream until it's just starting to boil in a saucepan.
2. Remove from the heat and stir in the chocolate until melted and glossy.
3. Pour over cake immediately, or leave to stand until cool and spreadable (it will reach a sort of nutella-like consistency), alternatively, put the ganache in the fridge until firm, then use to make truffles.

Wednesday, 2 October 2013

Vanilla and Chocolate Cake Truffles


Cake truffles. What an invention. Cake, buttercream and chocolate in a single mouthful. And a mouthful small enough not to feel too guilty about either. (Unless you make a batch for your brother then eat half of said batch with your friend.) What more could you want?


Technically these are just cake pops without sticks. Because who just has 30 cake pop sticks lying around? And since these weren't going anywhere fancy, I really didn't see the need to dress them up with anything except these darling mini cupcake cases (technically made for sweets, but imagine the teeny tiny cupcakes!!). These beauts came about through the piles of leftover trimmings from the two chocolate cakes I made recently, one being the Baileys cake and the other a chocolate orange cake, which will be my next post! I had some leftover buttercream from the cakes as well, so what better to do than mash it all together delicately, shape it into balls, and dip it in chocolate? Nothing.


These cake truffles are great as they are more fun to make than effort, and literally anyone could make them if they tried. They're quick and simple, and the payoff is great. They'd be especially good to make if you needed a dessert or treat but didn't feel comfortable trying to make or decorate your own cake. You could even *shudders* make these from a box cake mix and bought icing, which seems to be the way standard cake pops are made across the pond. Of course, though, I would never endorse using packet mixes unless absolutely vital...they don't even compare to homemade cakes.


I dipped my truffles in tempered white chocolate. If you don't know what temepered chocolate is, it's chocolate that has been melted, then mixed with unmelted chocolate a little at a time off the heat so that when you use it for coating and decorating, it sets at room temperature, and won't melt in your fingers. It's all quite sciency. Something to do with fat crystals or something, I believe. Google it for a better explanation if you want. It all sounds quite complicated, but basically you melt your chocolate in a bowl over a pan of simmering water. When it's melted you take it off the heat, and stir in a square of unmelted chocolate into the melted choc. Stir until the chunk has melted, then add another, stirring until that chunk has melted. Continue to add squares and stir, one by one until the chocolate has cooled and no more squares will dissolve. Your chocolate is then ready for coating! Because the chocolate will have cooled considerably by this point, it also means that it won't play up as much when you dip fridge-cold cake balls in it, giving you a lot less stress. Tempering works for milk, dark or white chocolates. If you can't be bothered with tempering your own chocolate, I believe you can buy pre-temepered blocks or coins of chocolate. Alternatively, just use normal melted chocolate, and store your cake truffles in the fridge to and after they set.


my very high tech method of coating the truffles
You can use any combination of cakes and icings, but I'd recommend sticking to buttercream or something that's relatively stiff. The butter in the buttercream also hardens up in the fridge, helping the truffles keep their shape, something I'm not sure you'd get if you used a runnier icing. I think ganache would also work well, as the chocolate would also set in the fridge, helping to keep the truffles firm.


Vanilla and Chocolate Cake Truffles

cake of any kind, leftover or fresh, cooled (the amount you use will obviously influence the number of truffles you can make. I would say that 2 8'' layers of cake would make about 20-30 truffles.)
buttercream, any flavour
melted chocolate, tempered or untempered *see above*

1. Crumble your cake in a large bowl with your hands. You want to really break down the cake, and make it into crumbs, the finer the better.
2. Add buttercream. Just eye it. Add a few tablespoons to start, you can always add but it's hard to take away, unless you've got loads of spare cake crumbs to balance it out again. I didn't think so...
3. Mush with your hands. Mix well until combined. You want to add enough icing so that when you squeeze a handful of the mixture, all the cake crumbs stick together and could be rolled into balls, be careful not to add too much that you end up with a more-icing-than-cake paste.
4. Roll into balls, whatever size you want. Place on a baking tray lined with baking paper. Refrigerate for at least half an hour so the butter firms up and the cake balls are hard.
5. Dip into melted chocolate. If you're only working with a small amount of chocolate (like I was),  put your chocolate into a tall container, like a glass or cup. This means you can just drop in the truffles without having to roll them around in the chocolate loads and dirty your chocolate with cake crumbs. I used a high tech method of dropping the truffle in, turning it over once or twice with a fork, then lifting it from underneath with the fork and tapping the fork hard on the side of the cup to remove any excess chocolate.
6. Place back onto the baking sheet or into sweet cases. Refrigerate if using untempered chocolate, tempered chocolate will dry at room temperature.

Store in the fridge. The cake truffles keep well for quite a while because the chocolate seals in their moisture!

Thursday, 26 September 2013

Baileys Ganache Buttercream


This buttercream is amazing. Silky, smooth, chocolatey, and, best of all, full of Baileys! Wonderful stuff.
This recipe came about when I had lots of leftover Baileys ganache from the chocolate Baileys 'thank you' cake, and didn't want it to go to waste. So, as usual, I threw it in the kitchen aid and started chucking things in with it. First I added just icing sugar, but this wasn't giving me the smooth buttercream texture I wanted, it was yielding a more royal icing consistency. So then I added butter. What emerged from my whirring cauldron was a light and fluffy, yet intensely rich chocolatey, Baileys-y delicious mousse like icing, that piped beautifully.

Make this. Enjoy. Thank me later.


Baileys Ganache Buttercream

Left over Baileys ganche, cooled, but still runny (leave it to cool too long and it will set hard)
Butter, slightly softened
Icing sugar

1. Mix ganache with a mixer until smooth and aerated. Add icing sugar gradually, beating constantly until a thick paste forms. Gradually add butter in small chunks and whip in until everything is mixed well and you get a pipeable buttercream texture.


Keep any left overs in a sealed container or bag in the fridge.

Monday, 23 September 2013

Baileys Chocolate Cake


I'll admit, I haven't been paying too much attention to this blog lately. This saddens me. But it's gotten harder and harder to bake things lately because I'VE BEEN SO BUSY MOVING IN AT UNI ARGHHH. Phew. It got intense there. I've been here at the University of Exeter's Cornwall campus, Falmouth for just over a week now. Going from being a only-child-living-at-home to a flat of 8 rowdy 18 year olds has been quite an adjustment, but I'm loving the freedom and unaccountability and am really starting to love it here. If only I didn't have to go to lectures...

But I digress. Before I departed for the glorious shores of Cornwall, I did make something of a backlog of recipes (all 2 of them) to tide me through the first few weeks of Uni. I made this cake as a thank you, you probably guessed by the writing on it, to my best friend's parents, who gave me a touching card before I left. Any excuse to make a cake, I say.


This chocolate cake is a recipe I haven't shared before. It's moist, rich and delicious, but, interestingly, I don't think it lasts quite as well as my own chocolate cake recipe, and I'm not just saying that. I found it had the tendency to dry out slightly after a day or two, whereas mine stayed fresh for days and days. Nevertheless, it's superb fresh.

I filled the cake with a quantity of my baileys buttercream, and coated the cake in a ganache made with baileys and chocolate instead of the traditional cream. It worked wonderfully! (Note: the ganache will actually help the cake keep moisture, meaning it stayers fresher for longer!) The left over ganache gave me a base for my piping incing - I just added enough icing sugar to get it to a stiff, pipeable consistency. After I'd written my message, I finished the cake with a sprinkling of grated chocolate - a perfect end!


Chocolate Cake 
Makes 2 thick 6'' cakes, or 2 normal thickness 8/9'' cakes

225g butter, softened
225g soft brown sugar
200g self raising flour
25g cocoa powder
4 eggs
125g dark chocolate
120ml milk

1. Preheat the oven to gas mark 5. Grease and line cake tins. Cream together the sugar and butter, and melt the chocolate and milk in a bowl over a pan of simmering water until combined. Set this mixture aside to cool slightly.
2. Crack the eggs into the butter mixture, one by one, beating after each egg has been added. Fold in dry ingredients and cooled milk and chocolate mixture.
3. Pour into prepared tins and bake until a knife inserted in the centre comes out clean, or until the cakes have stopped 'singing' (making a bubbling noise) - sounds weird but it really works! This should be about 30 minutes for standard cake tins, but will take longer in deeper tins.
4. Let the cakes cool on a wire rack in the tins for at least 15 minutes before turning them out.


Baileys Ganache

300g dark chocolate
150-200ml baileys

1. Melt the baileys and chocolate in a saucepan over a low heat until combined, and they have reached a pourable consistency. If the mixture is too thick, add a little more baileys to thin.
2. Pour over sandwiched cake layers.


Recipe for the decorating icing will be the next post!

Friday, 13 September 2013

Cafe Citta, Cardiff

I've never written a restaurant review before. I know how ridiculous it is for a 18 year old to be analysing a restaurant chef's food. Don't judge me.


It was my Dad's birthday yesterday. Normally, we'd stay home and get a family take away, it being a special occasion, but my father, being the now quite middle aged and mature man (ya don't look a day over 25, Dad!) sensibly suggested that we combine the occasion with a visit to my Brother's new Uni house in Cardiff. Usually, when we go to Cardiff for a meal out (which, in my opinion, is painfully infrequently) we go to Cafe Rouge. Which is fine. It's nice, comfortable, familiar, and if you plan it right, quite cheap. But I jumped at the chance. 'JAMIE'S ITALIAN. JAMIE'S ITALIAN.' I shouted. I love Italian. If you couldn't tell.

But my father wasn't going to settle that easily. 'To TripAdvisor!' *points finger skyward*. 'Look, this place is number one on trip advisor's list of restaurants in Cardiff. Jamie's Italian is 136th.' 'And, what's your point?' I was thinking. But he did point out that Jamie's didn't have a great selection of vegetarian dishes, not brilliant news for Pete. So we ended up booking a table for 5 on a Thursday night at Cafe Citta. A true hidden jem. With fantastic food, a really cosy atmosphere, and entertainment provided by the chefs twirling pizza dough up in the air like you see on telly, I'd recommend the place to anyone.

                                                  This photo of Cafe Citta is courtesy of TripAdvisor
Photos of Cafe Citta, Cardiff

At first glance, Cafe Citta doesn't look like the best place to grab a meal. Situated on Church Street, Cardiff, the neighboring strip club and photocopying shop don't really set it in the best light. But look past that, it's about to get so much better. The Cafe itself is very narrow, and can only seat about 25 at a time. Not surprising considering every single dish is made fresh to order by just two chefs in the open kitchen at the back of the restaurant, who provide great entertainment flipping and spinning pizza doughs and firing them in the authentic pizza oven. I may have stared a little too much. But it was so interesting!!

The menu was wide and we all had a hard time choosing what we wanted. There was also a specials board that I assume changes every day. We started off with a garlic pizza, a housemade pizza dough thin crust spread with butter, garlic and rosemary, then fired in the wood oven. Because it was cooked in the hot oven the pizza we shared as a starter arrived in no time. It was delicious. The base wasn't too thin or crispy (something that stopped me ordering a pizza for my main), but instead was soft and slightly chewy, not too garlicy, and the crispy rosemary was a genius addition. My plan was to save my slice to eat with my main, but after a while I gave in, not wanting it to go cold before my pasta arrived. That, I would say, was the only downside to the place. The small kitchen and even smaller staff meant the wait for our main courses was quite long, especially as there were a few large parties waiting on their meals at the same time. This wasn't a problem for us, but I can see how it could be annoying for some.

                                                     This photo of Cafe Citta is courtesy of TripAdvisor
Photos of Cafe Citta, Cardiff
a folded pizza

I honestly can't remember the name of what I ordered, because it was something really long and Italian. Basically, it was spaghetti with a rich tomato sauce, pancetta, chillis, red onion, garlic and rocket. It was amazing. The sauce was smokey and delicious, and there was just enough to leave you well satisfied, but not overly stuffed so I couldn't sample other people's. Speaking of, my brother, Pete, being a vegi (who they were very helpful and accommodating to, saying they could make practically anything vegetarian, seeing as it's made to order), ordered a 'folded pizza' (pretty much exactly how it sounds, a pizza folded like you would a pancake, a few more times than a calzone) with courgettes, rocket and parma ham, but asked for the ham to be replaced with goat's cheese. I tried a bit. It was actually stunning. Like the garlic pizza, the middle of the dough was slightly under cooked and chewy, not at all crispy, which I loved. It oozed cheese and had incredible flavour. It'll probably order that next time we go, it was that good. My Dad ordered a porchini and Italian sausage pizza, which was also great.

We were left full and happy. The bill came to £62 for 5 meals plus drinks. Very reasonable. Especially for food of that quality. The staff were helpful and kind, and the family run atmosphere of the place really was lovely. It was also interesting to hear the waitresses and chefs speaking to each other in Italian, it really added to the authentic feel. Of course, it was miles away from real Italy, but probably a lot closer than the corporate chain Jamie's Italian.

It'd still love to go there sometime, though.
But I'll probably be returning to Cafe Citta first...

Saturday, 7 September 2013

Banoffee Puddings


Remember that leftover toffee sauce from the banoffee pie I made a few weeks ago? I knew I couldn't throw it away. It was just too damn tasty. So I made these (at the time, I stress, this post is being written much later). The idea started off that I was going to make sticky toffee puddings. This was fine, until I opened the cupboard to find but a single, solitary date in the packet that I thought was full. That just won't do.


So I panicked (the puddings were meant to be a dessert for a family meal), and decided to wing it. I used the same sponge recipe, but instead of using dates, I put sliced bananas at the bottom of each pudding dish. I covered these banana coins with a spoon of caramel and the sponge mixture. They worked out great. The bananas sweetened during baking and the caramel soaked into the sponge as it cooked. These little puddings were great and it was so nice to have single serve desserts that turned out really neatly.


These are delicious, but are also very sweet, so I'd recommend serving them with either cream or ice cream...


Banoffee Puddings
Makes 5

175g self raising flour
1/2tsp bicarbonate of soda
175g castor sugar
2 eggs
85g butter, softened
200ml milk

2 bananas, plus extra for serving
5tbsp caramel sauce, plus extra for serving
cream/ice cream

1. Preheat the oven to Gas Mark 4. Grease 5 single serve pudding basins/ramekins. Cream the butter and sugar together until light and fluffy then beat in the eggs, flour and bicarb slowly and gently. Incorporate the milk slowly until you have a runny batter.
 2. Slice the bananas into 1cm coins and divide between the pudding basins (you could also do this as one large pudding if you wanted), place a tablespoon of caramel sauce on top of the bananas.
3. Divide the cake batter among the basins. Level off and place basins on a baking tray. Bake for about 30 minutes, or until a knife inserted in the centre comes out clean. Serve with extra caramel sauce, extra sliced bananas, and ice cream/cream.


Thursday, 5 September 2013

Food Markets Of Nice, France


Today I got back from a week long holiday in Nice, France. After seven days of sunning, sight seeing and cocktailing, I think I'm finally drifting back down to Earth. I went with my BFF (cringe), Elinor (the 'El' from the previous post). We decided it would be fun to film our escapades and put them on YouTube. On the third day, we visited the Old Town markets, a personal highlight of the trip. The colours were so vibrant, and the atmosphere was amazing. Seeing all that fresh produce has definitely given me some interesting ideas to work with. If you're interested in checking out our little montage, and putting a voice to the face behind this vlog, feel free to check it out below. Or not. Links to previous and subsequent days are also around there too.